|
Quick Start |
  
|
|
Quick Start |
|
My Library - Adding a Performance Title
To add a performance title, activate the edit mode by checking the edit mode toggle box on the top RHS of the screen. There are 2 reasons why the suer would want to select edit mode.
| 1. | Entering a performance title |
| 2. | Editing a performance title |
When in edit mode, a tool bar (shown below) is displayed at the top of the screen. This tool bar allows you to edit your performance title document.

There are 3 mechanisms available to enter information within a performance title.
| 1. | Simply type the text and chords in using a keyboard; |
| 2. | Paste information from the clipboard copied from an existing document or website; or |
| 3. | Import an existing RTF file, text file, MusicXML, or PDF file |
The process to enter a new performance title
| 1. | Select My Library from the Tree Menu. The Music Library will appear. |
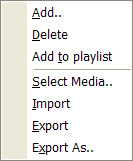
| 2. | Using the mouse, <right mouse click> whilst your cursor is over the performance Items will cause a menu to appear. |
| 3. | Select Add from the menu (shown below) that has appeared. |
Enter the appropriate information in the the dialogue box shown including title, artist, etc. then click 'OK'.
Select the 'content tab'. The content tab shows the blank performance document you have just created.
Create the text that you want using copy and paste (if you are pasting from another application) or by simply typing in the text.
Select the 'Save Document' Icon to save the newly entered performance title.
Once you have saved the performance title you can review by unchecking the edit mode checkbox.
Note that while in edit mode, using the keyboard's arrow keys (or foot pedal controls) will navigatethe user through the performance title (which is useful to edit the performance title document), whereas in performance mode (with the edit box unchecked), the arrow keys will navigate you through different performance titles in the playlist that you are in.
Creating a Playlist
To create a playlist follow these steps.
| 1. | Navigate to home until you see the tree menu. (To navigate to home, use the 'home' button on the keyboard, or click on the home icon on the StageDirector screen - little picture of a house - in the top left hand corner of the screen. |
| 2. | Select My Playlists on the tree menu. |
| 3. | The' playlists tab' will be shown on the RHS of the screen and the user will now see the playlist titles for each playlist. |
| 4. | <Right mouse click> whilst the cursor is over the playlists grid will cause a popup menu to appear. |
| 5. | Select 'Add', and enter the playlist details. |
| 6. | Then navigate to the next tab - the playlist tab - using the mouse to click on the playlist tab or use the <right arrow key>. |
| 7. | Use the the <right mouse click> menu to add further performance titles. |
| 8. | Continue adding titles to complete the playlist. |
| 9. | You can re-order the playlist by dragging titles up and down the performance title list using your mouse functions. |